
This post contains affiliate links.
Cutting a cheesecake properly has always been one of my shortcomings. I would run my knife through the cheesecake and half of it would get stuck on the knife. So I started thinking; What is the best way to cut a cheesecake? Is there more than one way?
How to cut a cheesecake? Put your cheesecake in the fridge to firm up. Take a thin, sharp knife and run it under hot water. Wipe the knife with a clean towel and cut the cheesecake all the way to the bottom and slide the knife out towards you. Repeat the process before each slice to ensure a clean cut each time.
Cutting a perfect cheesecake slice has been hard for me and many others to ever get right. However, there are various methods for cutting a cheesecake that I have learned throughout the years of baking this delicious cake. Here are some of the best ways to successfully develop the perfect cheesecake slice.
Use The Hot Knife Technique
Learning to cut a slice of cheesecake with a warm or hot knife has been a very helpful technique to use. It has saved more than a dozen of my cheesecakes from getting ruined when slicing. Running the knife under hot water makes it easier for the cheesecake crumbs not to stick to it. Getting it to glide straight through without a hitch.
If you’re looking to bake different-sized cheesecakes, I found the perfect 3 piece set of Springform Pans that I recently got for myself! This 3-piece set comes with 4, 7, and 9-inch Nonstick Springform Pans, which you can check out on Amazon!
A major tip that I would recommend would be to hold the knife under the hot water for at least 20 seconds. This will allow the knife to truly warm up which creates a better result when cutting. Repeating this constantly will help your knife remain warm throughout the whole cutting process.
If you are cutting your cheesecake at the table and don’t have a sink nearby, find a tall glass or container that can cover the entire blade of the knife. Fill it with hot water and repeat the steps at the tableside.
Cheesecake is a very delicious yet delicate dessert. That’s why picking the correct knife to use is a very crucial part of the cheesecake cutting process. There are many knives to choose from that might work on other cakes but won’t work on a cheesecake.
Try to avoid using serrated knives on your cheesecake to prevent a saw-like motion on this gentle cake. Instead, use a sharp flat-edged knife to do the cutting.
Apply slight pressure with this knife all the way to the bottom of the cake and remember to NEVER cut a cheesecake with a back and forth motion. This will ruin your cheesecake no matter how hot you make the knife.
Here’s a video perfectly demonstrating this technique:
*By the way, you also might be wondering Why Your Cheesecake Mixture Might Become Curdled. I recently wrote an article that explains exactly why your cheesecake mixture is curdled and what to do to fix it. You can check out this article here!
Use The Wax Paper Technique
This method of cutting a cheesecake is by far my favorite of them all. It caught my attention because it is rarely used or even talked about in the cheesecake community. As a person who invites a lot of guests over to my house on a weekly basis, learning about this technique has improved the overall presentation of my cheesecake.
Although you are still using your knife, you don’t need any hot water to warm it up like in the first method. To impress your guests, this method requires you to be a little more prepared in advance.
Below are the steps you’ll need to follow to cut the cheesecake into successful slices:
- Take a sharp, flat-edged knife that we spoke about in the earlier paragraphs
- Take wax paper strips that measure about 2X4″ or 2X5″ (Depending on the height of your cheesecake)
- Take one wax paper strip and fold it evenly and symmetrically around the sharp part of your knife (Be extra careful while doing this step)
- Make sure that the wax paper is hugging the knife tightly and evenly from both sides
- Grab both the knife and the wax paper from above and gently slide through the cheesecake to cut your slice.
- After that’s done, slide the knife out towards you and leave the strip of wax paper inside the cheesecake
- Repeat this step until the whole cheesecake has wax paper in between every slice
- If the wax paper is too long and is coming out from around the sides of the cheesecake, take scissors and cut off the pieces that stick out
In the end, you should have a beautifully cut cake with wax paper in between each slice providing an official look to your cheesecake.
This helps your cheesecake look professionally made to present to any family or guests. The wax paper looks nice and it impresses your guests. This method might take you longer, but it’ll be worth it with how pretty your cheesecake will look after it’s done.
*By the way, if you want to learn How to Travel With Your Cheesecake Safely so that it doesn’t fall apart, I recently wrote about it in my article that you can find here!
Use The Dental Floss Technique
Yes, I said it. Dental Floss. Even though this weird technique might seem like a simple solution to cutting a clean slice of cheesecake, you should still know how to use this method properly.
Below are the steps you need to take to cut a successful slice with Dental Floss:
- You need to pick the dental floss that is unflavored
- Cut out a long enough piece to cover the diameter of the cheesecake as well as some room for your hand to be able to hold it. I usually take an additional 8 inches of floss more than the diameter of the cake. For example: If your cheesecake is 12 inches in diameter, I would get 20 inches of floss.
- Wrap the floss tightly around your fingers on both hands and stretch out the floss above the cheesecake
- Tightly stretch the floss, gently place the floss onto the surface of the cheesecake and push it down all the way through until you reach the bottom
- If you have a rough crust on the bottom, make sure to slide the floss back and forth with your hands to cut through it completely
- Once that’s done, let go of the floss with one hand and fully pull it out of the cheesecake with the other
- Repeat this process until you cut all the slices in your cheesecake
If you prefer this method over the wax paper method and you still want your cheesecake to look nice and presentable, you can fold and place the strips of wax paper in between every slice made with the dental floss.
*Side Note: If you’re looking to learn How to Decorate Your Cheesecake With Fruits The Right Way, It’s not as easy as you think. There are many ways in which you can decorate your cheesecake and you want to do it right. I wrote about it recently in my article that you can find here!
Cutting Even Slices Correctly
Now that you learned all three of these techniques, it’s time to put them to action. However, if you want to be slicing “The Perfect Cheesecake Slice”, none of the three methods would matter if you can’t cut each slice of the cheesecake evenly.
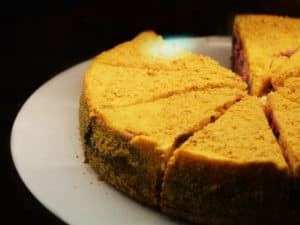
Even Cheesecake Slices
Begin by taking your knife or unflavored dental floss, whichever one is handier, and create 2 perpendicular straight lines on top of your cheesecake. Make it look like a big plus sign. Cut this plus out with one of the above methods following the lines of the plus to the best of your ability.
Once that’s done, you have 4 quarters of cake waiting for you. With each quarter, turn the plate and measure about 45 degrees in between each quarter slice and cut it to make 2 smaller even pieces out of this quarter.
Repeat the same step with EACH individual quarter slice cutting it evenly in half. In the end, you’ll have 8 pieces of even slices of cheesecake to enjoy.
If you want to learn how to cut a small round cake into 26 different pieces to be able to feed a whole party of people. In this article, I wrote about how to Turn Your Cheesecake Into Mini Cheesecake Bites! You can check it out here!
Mini Cheesecake Bites
Once you’ve learned how to cut the perfect slice, it’s time to learn to cut your cheesecake into various different shapes and sizes. At this point, cutting a cheesecake should be more like an art than a hobby.
So you made a whole cheesecake and realized that you want to cut mini cheesecake bites out of it. This could be a very menacing task for a beginner baker, I know it was for me. That’s why I started looking and I found the best way to approach this step.
If you want to learn the exact step-by-step instructions on How To Cut A Cheesecake Into Mini Cheesecake Bites using several different methods, you should definitely check out the article that I wrote about it here.
I searched long and hard to find out exactly how I’ll be able to cut a cheesecake into mini bites. I found a set of Stainless Steel Cutters that are tall and should fit the size of your cheesecake. These cutters come in 5 different shapes; heart, round, round-ribbed, square, and square-ribbed.
I started using these cutters on some of my cheesecakes and my guests absolutely loved them! Following the hot knife technique mentioned above, you should use hot water to warm up your cutters before using them. Check out these Cutters on Amazon!
To Summarize…
In conclusion, I’ve learned a lot throughout this journey of learning how to cut a perfect cheesecake slice. All of these methods and techniques of cutting a successful slice have made me even more excited to continue baking this warm, fluffy and welcoming piece of art known as The Cheesecake!