
This post contains affiliate links.
Baking different desserts in my kitchen is one of the biggest pleasures I have. Learning how to properly bake in different types of pans and molds quickly became my biggest passion. Silicone bakeware was always a stranger in my kitchen. This was until I decided to buy a bunch of silicone molds to experiment with and I never knew that I was going to love them so much!
My passion quickly led me to learn anything there is to know about different types of silicone molds and how to properly bake in them. Making this decision has been a game-changer for the baking journey that I experience in my kitchen on a daily basis.
I hope that I can save you the hassle of researching by sharing all the tips and tricks that I’ve learned about silicone bakeware in the past few years of my baking journey!
Table of Contents for My 14 Tips and Tricks
- Collect All Silicone Shapes And Sizes
- Make Sure Your Silicone Bakeware Is Actually Silicone
- Clean Your Silicone Molds If They Are Brand New
- Stick With Baking Desserts In Your Silicone Molds
- Surround Your Silicone Mold With Something Sturdy
- Grease Your Silicone Pans Correctly For Easier Cleanup
- Using Your Silicone Bakeware At The Right Temperature
- Cool Your Silicone Pans After Baking
- Peel Your Silicone Bakeware Carefully
- Use Your Silicone Molds With Many Kitchen Appliances
- Make Some Frozen Desserts
- They’re Not Only Used For Baking
- Store Silicone Molds In Zip Lock Bags For Fresh Bakeware
- Be Creative While Baking In Your Silicone Molds!
1. Collect All Silicone Shapes And Sizes
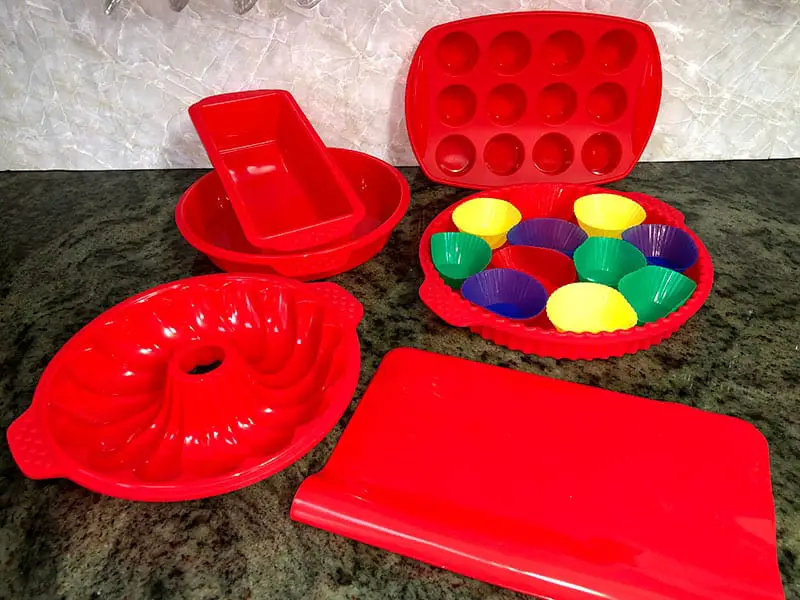
The first thing I’ve learned was that there is an abundant array of different types of silicone molds with different shapes and sizes made for any occasion. Seriously, it blew my mind when I saw silicone molds with almost every shape that I can think of! You name it, they’ve made it.
If you’re looking to get yourself silicone molds, I would recommend getting a set that has all types of pans and molds. I found the perfect 41-piece-set of silicone molds that include Silicone Cake Molds, a Nonstick Baking Sheet, Silicone Donut Baking Pans, 12 Cup Muffin Pan, with 36 Pack Silicone Cupcake Baking Cups.
This Silicone Bakeware Set is the perfect starting kit for anyone learning how to bake in silicone molds. You can check out this set on Amazon.
Silicone molds shapes start with ordinary flowers, stars, and heart-shaped molds all the way down to footballs, mermaids, and even dragons! The selection is incredible!
Besides the different shapes, there are also a bunch of different silicone mold sizes made for anything that you want to bake:
- Large Cake Pans – Perfect if you’re looking to make a big cake. (Which again come in many different shapes to accompany it)
- Bread Pans – Perfect for making a loaf of bread or any type of long pastry.
- Muffin Pans – Perfect for making muffins and brownies.
- Cupcake Molds – Perfect for making a bunch of separate cupcakes.
- Bundt Pans – Perfect for making any sweet cake or coffee cakes.
- Pie Pans – Make a perfectly crusted pie in any flavor.
- Silicone Mats – Made for a clean baking experience.
This list does not include the countless different accessories made out of silicone to help you in your baking experience. These different shapes and sizes are only the tip of the iceberg with everything that is already out there. Owning several of these molds will definitely help you expand your baking knowledge as well as expand your culinary arsenal!
2. Make Sure Your Silicone Bakeware Is Actually Silicone
When buying your first silicone pans, it’s really hard to determine if you’re buying the right thing or not. Silicone molds are made out of silicone rubber which can be easily mixed up with ordinary plastic or other unsafe materials.
However, silicone rubber, unlike plastic, is a material that can be used safely in the oven, which makes you want to pick the right type of material from the getgo.
There are several ways that you can determine if you have the appropriate silicone material:
- The smell is a big giveaway – Make sure that your molds do not have a plastic stench when first examining your molds. This smell can present itself when first opening your package, or after putting it in the oven for a few minutes.
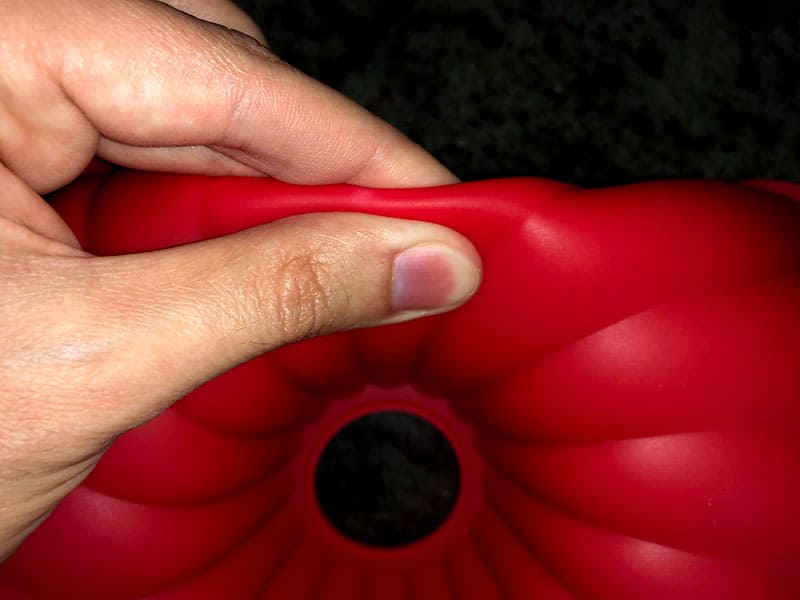
- Bend the silicone molds – Once a silicone mold bends it should revert back to its original shape without leaving any marks. If the mold is made up of a different material, it will leave a white streak across the section where the mold was bent.
3. Clean Your Silicone Molds If They Are Brand New
Once you’ve determined that you’ve picked out the right silicone material, it’s time to get it ready for its first baking adventure. When first opening up the silicone mold package, you find that the molds can be very dusty and covered with manufacturing residue. That’s why it is important to properly clean your molds before starting to bake in them.
Make sure to follow this step by step process of properly cleaning your mold with every silicone mold you buy or own:
- Rinse out your molds with soap and cold water (Make sure that you don’t scrub the mold with a rough sponge because it will ruin the integrity of the silicone)
- Let the mold dry
- Cover the entire mold with a thin layer of oil
- Preheat the oven and put the empty mold inside for 10-15 minutes
- Take the mold out and check for the presence of a bad smell
- Rinse out the oil and let it dry once more
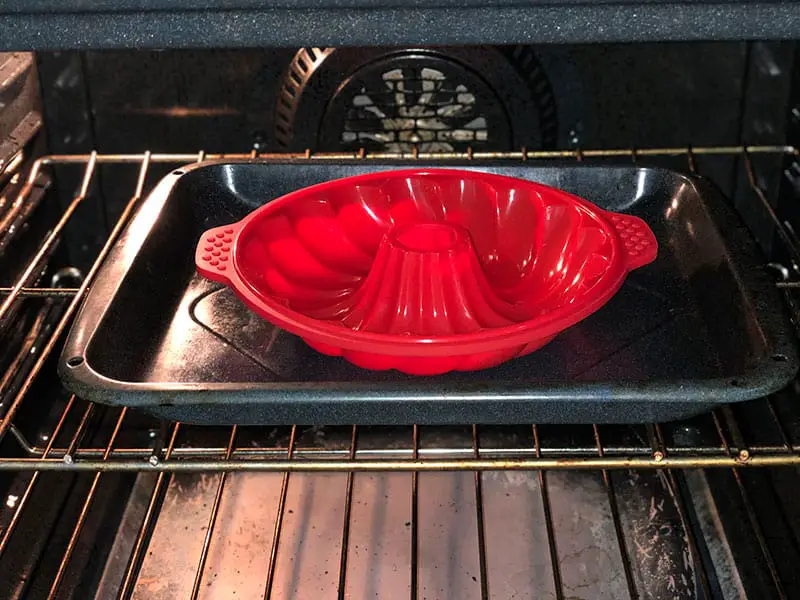
This silicone mold has now been fully cleaned of any factory chemicals and is ready for the baking of an amazing dessert.
4. Stick With Baking Desserts In Your Silicone Molds
Baking in a silicone pan is very fun to mess around with. Having all these shapes and sizes can really spark a baker’s imagination. However, after experimenting with several different types of foods, I’ve come to the conclusion that silicone molds are much better to be used for baking sweet desserts rather than baking food.
While attempting to bake a chicken pot pie in my silicone mold, the ingredients inside caused the crust of the pie to get completely soaked. The silicone material creates a stew-like environment for the ingredients in the chicken pot pie causing it to mush and turns the dough around it soft instead of a nice crispy crust.
This was very disappointing to find out as I retried to bake it several times with the same result. I’m going to recommend sticking to making desserts in your silicone bakeware instead of food and enjoy the sweet-tasting masterpieces that come from baking a dessert in a silicone mold.
5. Surround Your Silicone Mold With Something Sturdy Before The Oven
Before starting to make your batter you have to keep in mind that your silicone mold needs to be propped up against something in order to avoid drooping of the mold.
The advantage of having a silicone pan over a metal pan is that you can make different cakes with many shapes and sizes. Metal bakeware can’t always match the shapes that silicone pans are mold into.
It’s important to know that when you pour batter into a silicone mold, the edges of the mold tend to expand causing the mold to stretch. This usually happens in large silicone molds instead of small ones because there’s a more unsupported surface area.
You can support your large silicone molds in many ways:
- If you’re using a flat silicone mold such as a bread pan or pie pan, put your mold on a metal sheet pan. Roll up a few large balls of aluminum foil and put them around the silicone mold. Do so until you’re sure that the silicone mold won’t droop when pouring in the batter.
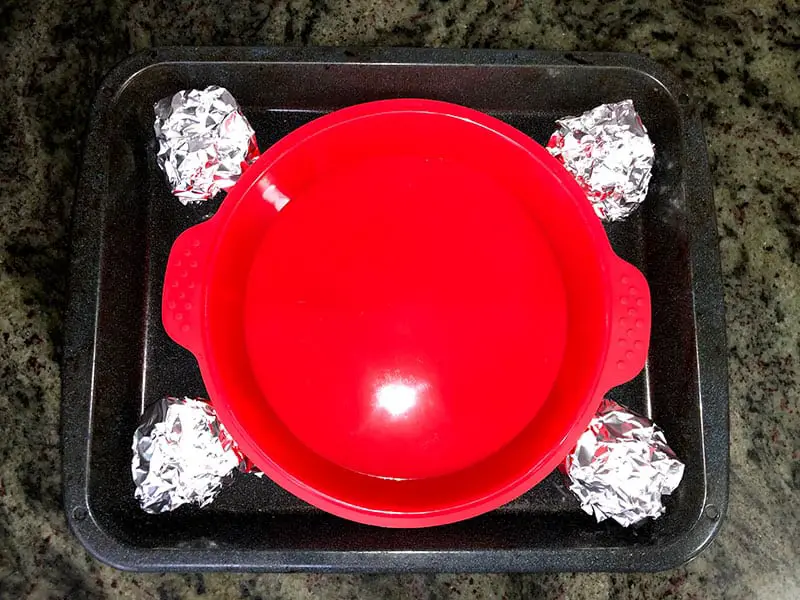
- If you’re using a round silicone mold such as a bundt pan, you’ll need to use a large cooking pot to support your round mold. Make sure you pick the right sized pot and put your bundt pan inside. Not only will it keep the sides of the pan from drooping, but it’ll also help make your cake longer. After pouring in the batter, the pan will stretch downward and create a tall beautiful cake from it.
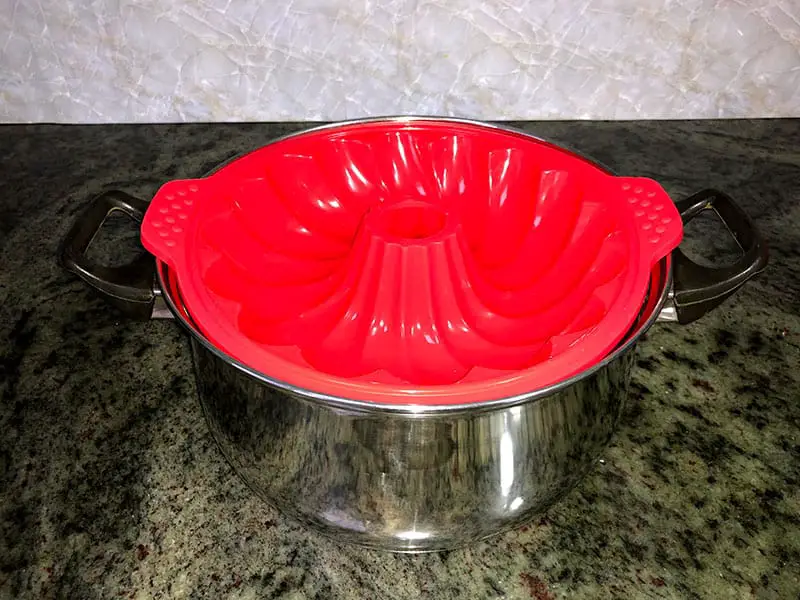
Make sure that your pot’s handles won’t melt!
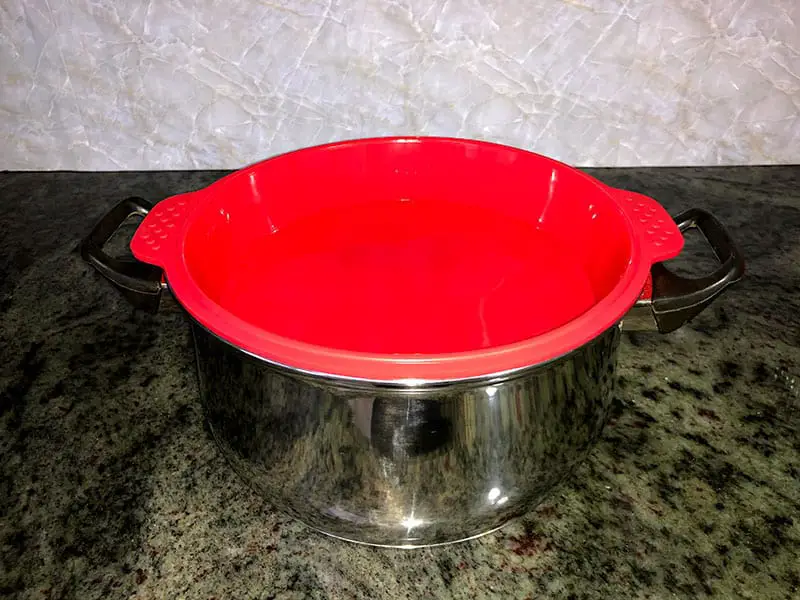
Make sure the pot is the right size for the mold not to fall in with heavy batter!
Whichever mold you’re deciding to use, don’t forget that the silicone flat molds must have some kind of a metal sheet pan underneath them. Avoid putting silicone molds on an empty oven rack.
*Remember to NEVER let the edges of your silicone molds touch the walls of your oven!
6. Grease Your Silicone Pans Correctly For Easier Cleanup
Most pans have to go through a rigorous process of greasing before ever applying the batter. Silicone pans, however, are not like most pans. They are made to stand out from the ordinary pan you have at home. Most silicone molds are made to be non-stick because they are designed to easily remove your baked goods from within the molding.
Baking pans are greased for many reasons:
- Easy removal from the pan
- Prevent burning of the outside of your baked good
- Prevent the breaking and sticking of the batter
- Easy cleanup once finished
With silicone pans, the only thing that I would recommend for you to use is to spray a thin layer of cooking spray along the inside of your mold to ensure the effectiveness of the prestigious non-stick silicone pan. Doing this will target all four of the bullet points mentioned above with half of the effort of greasing an ordinary pan.
7. Using Your Silicone Bakeware At The Right Temperature
Each type of silicone mold has its own manufacturer-recommended temperature limits on both sides of the spectrums. These temperature limits should be put on top of the packaging for each mold.
Typically, silicone molds can withstand anywhere from -40 degrees Fahrenheit all the way up to 446 degrees Fahrenheit.
Making sure that the silicone pans are used at the right temperature is something to think about when first starting to bake with these elastic molds. Silicone molds absorb much less heat than regular pans, therefore making them bake your desserts at a much slower rate.
Knowing this, you might want to instinctively turn up the heat of your oven. While this sounds like a good idea, in theory, waiting out your baking time at the same recommended temperature you usually use is a better idea. This will ensure that you get the full benefits of not burning the crust of your baked goods like you would in a regular pan.
I recommend taking a match or a wooden toothpick to occasionally check on your creation by poking it and pulling it out. If you see that the batter is sticking to your utensil than your creation is not yet ready. If the utensil comes out clean and smooth than your baked good is ready to be taken out of the oven.
*Remember to NEVER expose silicone to open flame sources. They will melt!
8. Cool Your Silicone Pans After Baking
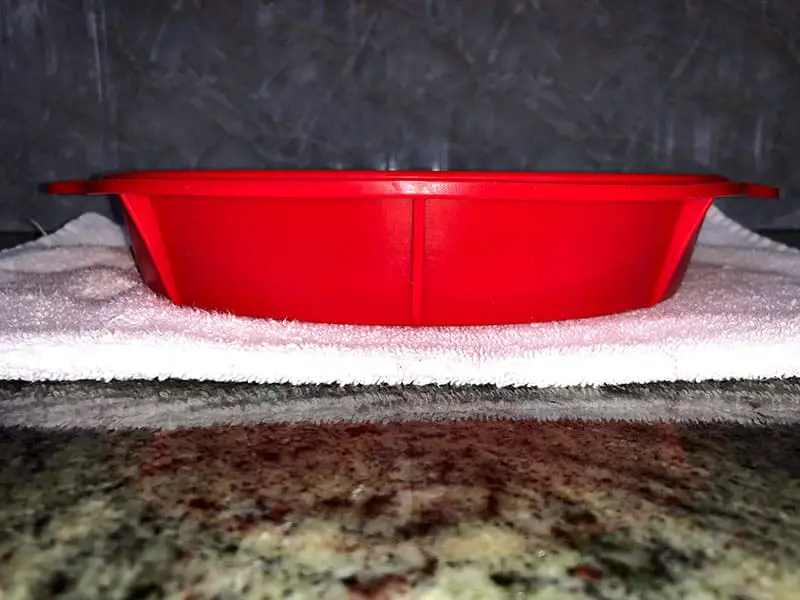
Once ready, remove your silicone mold out of the oven and off of the metal pan or pot that you’ve placed it on (Don’t forget to use your oven mittens!). Leave your pan to cool for at least 10 minutes before removing the silicone mold. This will lower the temperature of the silicone which allows the baked batter to fully unstick from the pan.
What I usually do is place a wet towel underneath the silicone pan right after I take it out of the oven. I do this when I’m in a little bit of a hurry to serve my baked goods. The pan cools much faster which allows me to move on to the next step of removing the silicone from your masterpiece!
9. Peel Your Silicone Bakeware Carefully
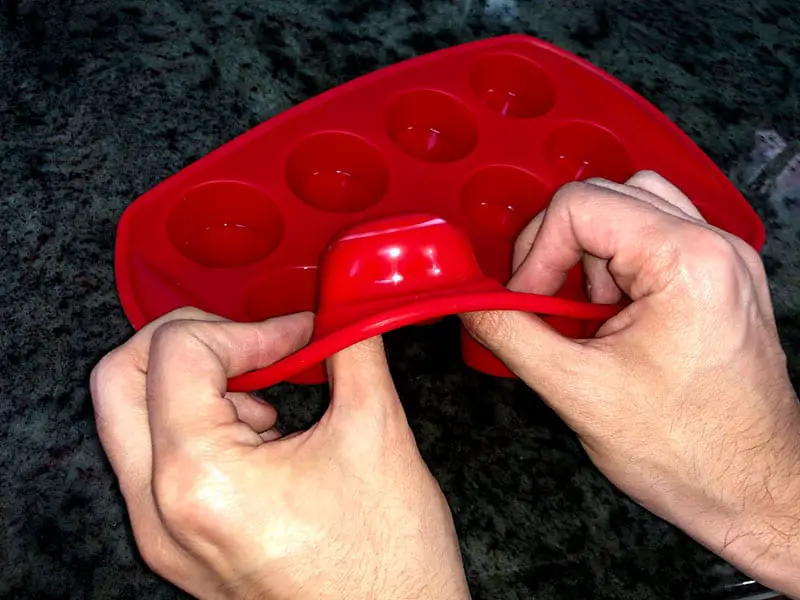
Peeling your silicone mold might sound like an easy task, but can quickly turn into a major hassle depending on the type of shape that you decided to bake in. I would recommend following this simple 4 step process to properly remove your baked goods:
- Avoid banging your silicone pan on your countertop – This will possibly make your cake collapse on itself.
- Pinch and pull each side of the stretchy silicone pan away from the middle – Make sure to do this a few times to fully separate each silicone shape that you might be baking in.
- Place your thumbs on the bottom of the silicone mold and your fingers at the top to quickly invert the silicone mold – If you’ve baked large cakes, invert the mold inside out on to a plate and if you’ve baked some muffins, repeat the same process but this time grab the baked good from the bottom as the mold inverts.
- If the dessert is still stuck, try repeating step 2 more thoroughly before moving on to step 3.
I love using the inverted silicone mold to present my baked goods to my guests. Having my desserts propped up in the air with the inverted mold really looks nice at a table cluttered with other desserts. Once the molds are inverted, cleaning them is a breeze. This leads me to talk about silicone use in household appliances.
10. Use Your Silicone Molds With Many Kitchen Appliances
Most silicone bakeware are dishwasher safer, making cleaning silicone a very simple task. All you have to do is simply put your inverted silicone mold on the top shelf of your dishwasher and it would clean it thoroughly. However, keep in mind, that not all molds are gonna stay inverted. From my experience, only the big molds can stay inverted for some time.
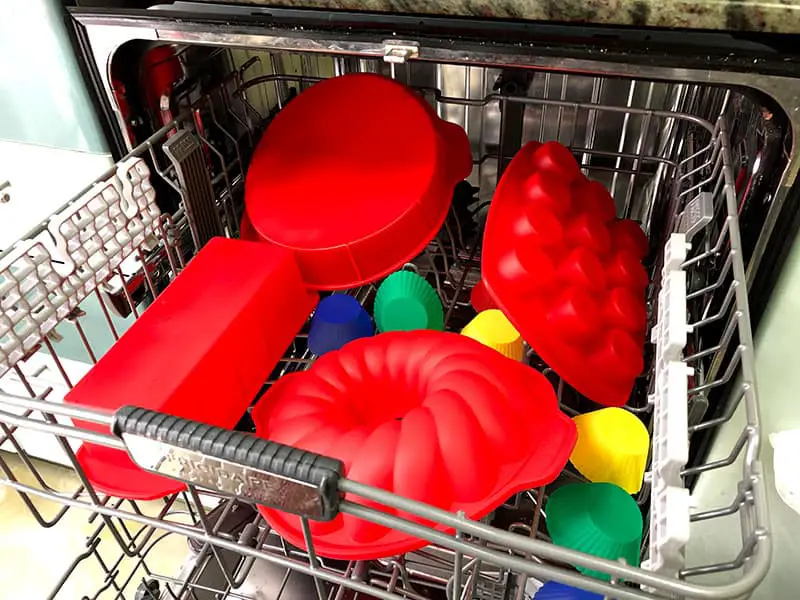
When cleaning small molds like muffin pans and cupcake pans, I usually soak the mold in cold water to remove any excess crumbs before placing it upside down inside the top shelf of the dishwasher.
Remember, silicone molds are very versatile and are made for almost any occasion. That’s why it works with almost all kitchen appliances. Here are the appliances that work perfectly with silicone bakeware:
- Dishwasher
- Oven
- Toaster oven
- Microwave
- Refrigerator
- Freezer
With their versatile nature, silicone molds definitely sparked my creativity into using these appliances to make some of the best desserts that I’ve ever made. Making these the best pans I’ve ever worked with!
11. Make Some Frozen Desserts
Most freezers reach temperatures from 0 to almost -18 degrees Fahrenheit. These temperatures are perfect for silicone molds as they are made to last up to -40 degrees Fahrenheit. Knowing this I decided to use these molds to make some amazing frozen treats.
Starting from everyone’s favorite dessert. I’ve made some pudding using the silicone muffin pan as my pudding vessel. Once the pudding was made, I poured it into the pan and put it in the refrigerator for about 2 hours (or freezer for 20 minutes). This gave me a nice cold pudding for everyone to enjoy.
Try putting a few Popsicle sticks inside each pudding crevice. Hold it in the freezer for just a few minutes longer and you’ll have yourself a yummy frozen pudding popsicle.
I’ve also made some jello using the same method of using the fridge. It came out just as good as the pudding version of this dessert.
Remember to be creative! Experiment using many different recipes. The other day, I’ve made football-shaped ice cubes using the silicone mold and put them inside our drinks for the Superbowl. My husband definitely thought that was creative!
12. They’re Not Only Used For Baking
Silicone bakeware has become a staple in my kitchen ever since I first introduced them a few years ago. I’ve found that silicone bakeware has many useful attributes in a baker’s kitchen.
While kneading dough, I’ve found that you can use a silicone mat to separate the dough from the countertop as well as using another silicone mat to separate the dough from the roller itself. This has saved me so much time while making my dough since I didn’t have to constantly remove the dough from the countertop or the roller.
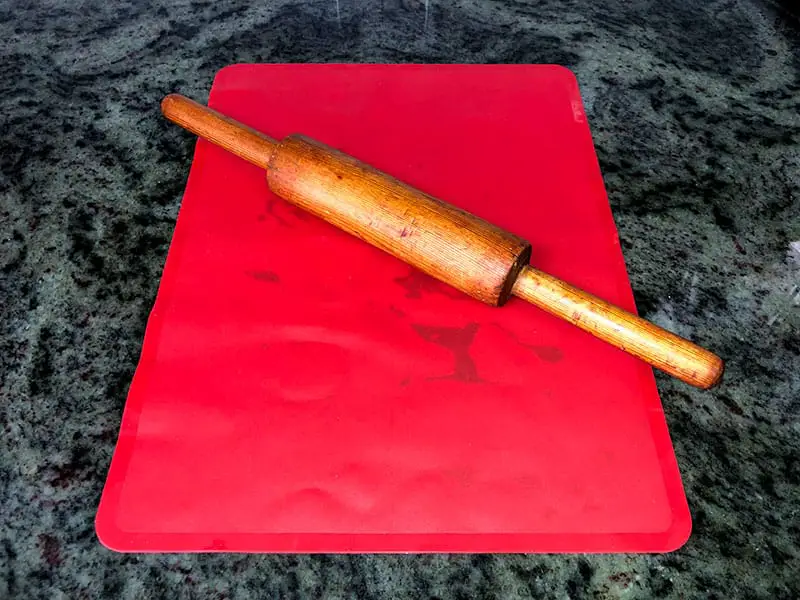
Use The Silicone Mat As a Base For Rolling Out Dough!
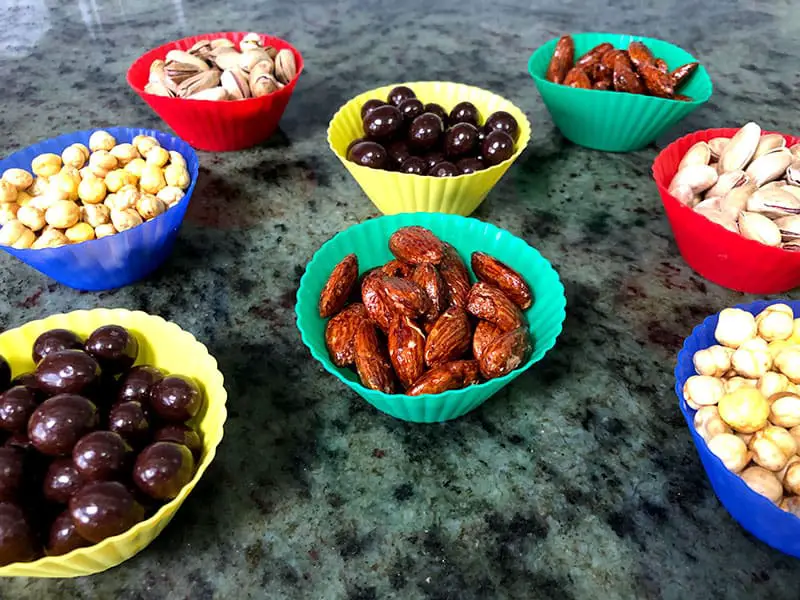
I’ve also used the silicone molds as reusable serving cups. After baking my cupcakes, I use the empty cupcake molds to pour in different types of nuts and eatable goodies. The different colors of the silicone molds will make your table colorful after serving your desserts!
13. Store Silicone Molds In Zip Lock Bags For Fresh Bakeware
Silicone is a type of material that once left in the open for too long can start to feel weird. After buying a whole bunch of different molds I ended up using some more than others. My mistake was that I left the silicone molds that I didn’t use out in the open for too long.
What happens is the silicone material becomes dusty and sticky when it is exposed in the open air for too long. This can quickly become a hassle as it is not easy to remove the stickiness from the silicone.
Once making sure that your silicone is fully dry, I suggest covering up your silicone bakeware with a plastic bag or a ziplock bag.
Make Sure To Place The Silicone In An Air Tight Bag!
This will work out great since silicone molds stack together really well and are very easy to store. Stacking all of your silicone bakeware will save you so much room when working in a tightly packed kitchen while enjoying every moment of it!
14. Be Creative While Baking In Your Silicone Molds!
I’ve mentioned time and time again to try to be creative with your silicone molds. I know that this is easier said than done (speaking from experience). Here are some baking ideas I’ve used with the silicone molds:
- Using your silicone muffin pan, spread lines of melted chocolate inside the pan. Let the chocolate harden either in the fridge or not and invert the pan to take out the hardened chocolate. You can decorate an ice cream dessert with these chocolate lines.
- Using your silicone muffin pan, you can also spread melted chocolate by lining the inside of each muffin mold. Let the chocolate harden either in the fridge or not and invert the pan carefully not to break the chocolate cup. You can fill each chocolate cup with ice cream or other types of desserts and serve it.
There are thousands of different recipes you can try to bake within the silicone molds. Starting with chocolate brownies and cheesecakes all the way to making some chocolate mouse. You can also combine a couple of cake shapes together in order to make a beautiful cake tower!
If you are looking for a non-baking related creation. Look into making some homemade soap or even crayons. Try out anything that comes to mind and you’ll see for yourself the endless possibilities that you have with silicone molds!