
This post contains affiliate links.
In my childhood, I used to eat spoon fulls of condensed milk straight out of the can without realizing that it could be used for so much more. My grandma thought me that boiled sweetened condensed milk can turn into caramel or dulce de leche if done properly! That day I learned how to boil a can of condensed milk step-by-step the right way!
- Fill a large pot with enough water to cover a can
- Heat the water until it reached a low boil
- Remove the label from the can of condensed milk
- Make a small hole in the can to let pressure escape
- Submerge the can into the boiling water using tongs
- Place the can on its side so it doesn’t bop in the water
- Boil the can for 3 hours, add more water if needed
- Make sure the can is covered by water at all times
- Using tongs, take out the boiled can to cool
- Make sure the can is cooled to room temperature
- Open the can and use a spoon to stir until smooth
- You know it’s done if the sugar inside turned brown in color
This step-by-step process has helped me achieve the perfect caramel consistency every time I boiled a can of condensed milk! However, you’re not done yet. You still need to know some important information that you need to keep in mind before starting to boil the can of sweetened condensed milk!
How to Boil A Can of Sweetened Condensed Milk?
To properly boil a can of sweetened condensed milk, you have to make sure that the can is fully submerged in the water throughout all 3 hours of the boiling process. Doing this will help all the sugar inside the condensed milk caramelize at an even rate.
Before starting to boil the can, make sure that you fill up enough water inside the pot to fully submerge the can. A fully submerged can will caramelize equally on all sides!
Make sure to take off any label that is attached to the can. Removing the label from the can will prevent it from getting soggy, detach, and float all over your pot of water.
Carefully submerge the can into the boiling water using a pair of tongs so that you won’t get burned by the water. Make sure you place the can on its side, so it can roll around and caramelize evenly. If you place the can vertically, the boiling water may make it bounce up and down.

*By the way, the Double Boiler works great when you’re trying to melt something like chocolate while heating up other ingredients. I recently wrote an article that gives a breakdown of the 3 Best Double Boilers that people use in each stage of their baking journey.
After reviewing these double boilers, the Best Overall Double Boiler was the Stainless Series 2-Quart Covered Double Boiler which worked great for the dessert needs in my kitchen. You can check out this Double Boiler on Amazon!
While I recommend placing the cans horizontally inside the pot of water, you can also place the cans vertically if you have more than one can to boil. When you’re boiling more than one can in a pot, try to make them fit snuggly so that they don’t bop up and down.
You can adjust the boiling time with 30-minute increments to make the caramel darker in color!
You will need to boil the can for 3 hours to get the perfect caramel product. Since water has a tendency to evaporate over time, you will need to constantly add more water to keep the can fully submerged in it.
Once done, use the same tongs to fish the can out of the water and place it on a cooling rack or some kind of heat-proof surface to let it cool for a while.
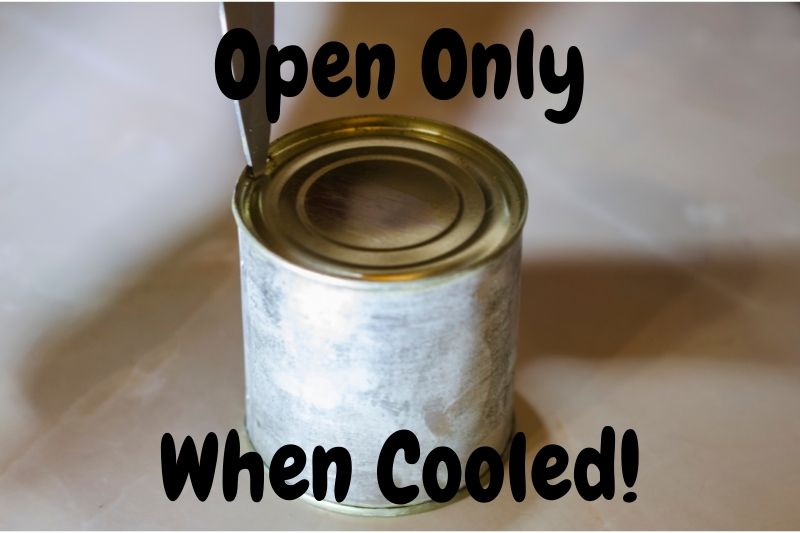
The can has to cool all the way down to room temperate before you try to open it. Depending on the temperature of your environment, this may take anywhere from 3 to 4 hours.
Make sure to only open the can once it reached room temperature!
Since the can is closed, the heat created inside the can will expand in all directions without anywhere to escape. If you open the can while it’s still hot, the contents within it will jet out like a fountain.
*By the way, I recently wrote an article comparing Condensed Milk Vs Evaporated Milk. This article breaks down all the similarities and differences between condensed milk and evaporated milk as well as how to convert one into the other. You can check out this article here!
Make sure to stir the heated condensed milk to make it have a smooth consistency!
Is It Safe To Boil A Can Of Condensed Milk?
As a general rule, it is usually safe to boil a can of sweetened condensed milk when done properly. You can boil a can of condensed milk by placing the can in a pot full of water. Following all of the safety steps can prevent the condensed milk can from potentially exploding.
The steps you must take in order to boil a can of condensed milk safely include:
- Completely submerge the can in boiling water
- Always remove the label from the can
- Make a small hole in the can to allow the pressure to escape
- Use cans with solid lids, and do not use pop-off lids
- Use tongs to turn the can halfway through
- Make sure the can stays submerged in water for the entire time it is boiled
- Always allow the can to cool before you open it
WARNING!
You should only boil a can of condensed milk if you can constantly keep an eye on the water level and let the can fully cool before opening it! Not doing this can potentially make the can explode and cause bodily harm.
*By the way, I recently wrote an in-depth article about How To Safely Boil a Can of Condensed Milk. This article talks about what you’ll need to do to make sure that the can of condensed milk doesn’t explode when boiling it. You can check out this article here!
To prevent my cans of condensed milk from potentially exploding, I boil them in my double-boiler to keep direct heat away from the cans. I place the cans on the top pot that’s full of water with no problems.
*By the way, I recently wrote an article about How To Microwave Condensed Milk To Make Caramel. This article tells you everything you need to know when making caramel out of condensed milk inside a microwave. You can check out this article here!
What Happens When You Boil Sweetened Condensed Milk In A Can?
When a can of sweetened condensed milk boils, the sugar inside of the sweetened condensed milk caramelizes and turns brown in color. Since sweetened condensed milk has higher sugar contents than regular milk, the excess sugar turns into dulce de leche. To create caramel, just add milk and butter.

Keep in mind that boiling a can of condensed milk is not the only way! There are also other ways that you can turn your condensed milk into caramel or dulce de leche.
*Side Note: You might also want to know How To Turn Condensed Milk Into Caramel. I recently wrote an article about A Complete How-to Guide to Turning Condescend Milk Into Caramel, which you can check out here!
FAQs:
Can You Boil An Opened Can Of Condensed Milk?
Generally speaking, boiling an opened can of condensed milk has a less chance of exploding since the pressure that usually accumulates inside due to the heat will escape. Make sure that the hole where the can is open is not big enough for the condensed milk to leak out during the boiling process.
How Long To Boil Condensed Milk For Caramel?
On average, you can boil a can of sweetened condensed milk for about 3 hours long to turn it into caramel. Monitor the water level throughout the boiling process and add water when needed to make sure that the can of condensed milk is covered with water at all times. Keep the pot of water uncovered.
How Long Do You Boil Carnation Condensed Milk For?
On average, you can boil Carnation condensed milk by pouring it into a double-boiler pan for about 40-50 minutes on low heat. Stir the condensed milk occasionally and keep the double-boiler covered. Boil it until the sugar inside it is caramelized which makes it thick and brown in color.
How Long To Boil Condensed Milk For Banoffee?
On average, you can boil a can of condensed milk for about 3 hours long on a stovetop to turn it into Banoffee. Monitor the water level throughout the boiling process and add water when needed to make sure that the can of condensed milk is covered with water at all times.
Final Thoughts
Sweetened condensed milk is not just meant for eating it straight out of the can! You can do so much more with it like making caramel or dulce de leche. Following the steps outlined above will help you safely and correctly boil a can of sweetened condensed milk in order to make these creations a possibility!